We published over 1,000 pieces of student artwork on Artsonia first semester. Take a minute to check it out!
http://www.artsonia.com/schools/school.asp?id=116586
Sunday, December 20, 2015
Saturday, November 28, 2015
Observing Hands in 2 and 3 Dimensions


Tuesday, November 24, 2015
Art Club Christmas Ornament Fundraiser

We spent a chunk of the afternoon starting to glaze ornaments for the Art Club fundraiser. *The ornaments in the picture are not finished. :)
We will be selling remade ornaments Tuesday, December 1st at the Cobra Backers dinner before the Winter Pep Rally and at the basketball game Friday, December 11th- $5 a piece. We will also be taking orders for personalized ornaments ($7 a piece) which will be due Friday, December 4th. We are making ornaments for activities at JHHS and some more traditional Christmas ornament shapes. The ornaments could be personalized with an athlete's name and/or number, apple ornaments could have a teacher's name or a message added to it for a fun gift, or just about anything else. Please email Katie Morris if you have any questions.


Turn in order forms to a school office or to Mrs.Morris along with your payment. Checks can be made out to JHHS Art Club. Thank you!

Wednesday, November 18, 2015
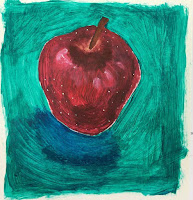
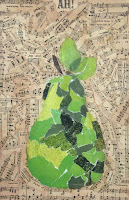
8th Grade Color Scheme Paintings
After the observational drawing unit, 8th graders learned about color schemes. Color schemes are basically a way to organize colors and their relationships. We covered...
Monochromatic- tints and shades of one color
Primary- red, yellow, and blue
Secondary- orange, green, and purple
Warm- colors from the warm side of the color wheel like red, orange, and yellow (purple can also be warm)
Cool- colors from the cool side of the color wheel like green, blue, and purple (yellow can also be cool)
Complementary- colors that are opposite on the color wheel like red and green, yellow and purple, orange and blue
Analogous- colors that are side by side on the color wheel like orange, yellow, and green
Neutral- "value" colors that are not on the color wheel like black, white, and gray
Tint- a color with white added to make it lighter
Shade- a color with black added to make it darker
After learning about the colors, each student chose one color scheme they wanted to use in a painting, chose either tempera paint or watercolors, and chose their subject matter. Here are some of the results. Can you identify the color schemes used?
*Black and white do not count against the color scheme. So, a painting that uses purple, yellow, black, and white would still be complementary.
**Brown is a shade of orange
1.

2. 3.
3.
 3.
3.
4.

5.

6.

7.

8.

9.

10.

Thursday, October 8, 2015
Graphic Design Classes- Chuck Close videos
Watch these videos and be prepared to discuss how Chuck Close approached his work. We will be drawing inspiration from his artwork for an upcoming collaborative project.
https://www.youtube.com/watch?
http://whitecube.com/channel/in_the_studio/chuck_close_in_the_studio/
https://www.youtube.com/watch?
http://whitecube.com/channel/in_the_studio/chuck_close_in_the_studio/
<iframe width="560" height="315" src="https://www.youtube.com/embed/ACedkrDXe48" frameborder="0" allowfullscreen></iframe>
<iframe width="420" height="315" src="https://www.youtube.com/embed/TlwCC6bIDDs" frameborder="0" allowfullscreen></iframe>
8th Grade Paper Weaving
Watch this video...
https://www.youtube.com/watch?v=ACedkrDXe48
<iframe width="560" height="315" src="https://www.youtube.com/embed/ACedkrDXe48" frameborder="0" allowfullscreen></iframe>
Then make your own paper weaving! There is a poster on the bulletin board wall by the file cabinet with ideas and pre-cut strips of paper. You can use scissors to cut the paper into thinner strips and stack them on top of other strips if you want. Make something interesting. Go beyond the checkerboard!
http://www.katiemorrisart.com/2014/02/beyondthecheckerboardpt2.html
http://www.katiemorrisart.com/2014/02/beyondthecheckerboardpt1.html
Sunday, September 27, 2015
2D Boot Camp
To build a foundation before moving toward assignments that allow more choices, Graphics students have been going through an art "boot camp".
First we practiced observational skills by "drawing on the right side of the brain" and drawing a still life object that was shaded with pencil. The students chose from some objects I'd brought from home or anything they could find in the classroom.


Next, the students practiced creating an interesting composition and utilized several different ink techniques.

To start with color and paint, students worked in teams to mix tempera paint to match paint samples, completed a one day acrylic study and a one day watercolor painting. I told the students they were not allowed to draw their compositions in pencil for the one day studies, they had to paint directly on the paper. It was good for some of them to loosen up a bit.


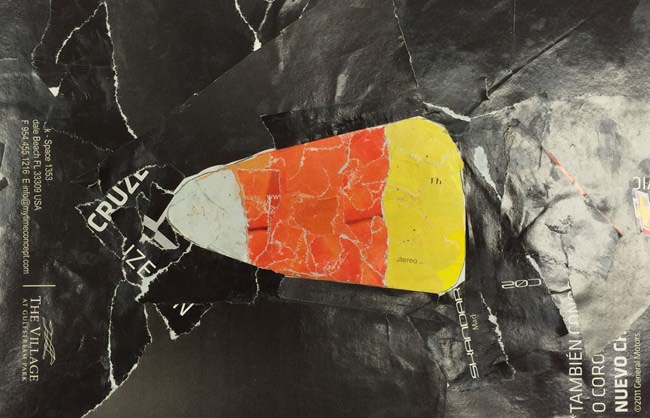
 After painting, students made torn paper collages and experimented with mono prints made on gelli plates.


Soon, the students will have the opportunity to work further in the medium they choose and we will start to have assignments based on themes. I can't wait to see what they come up with!
First we practiced observational skills by "drawing on the right side of the brain" and drawing a still life object that was shaded with pencil. The students chose from some objects I'd brought from home or anything they could find in the classroom.


Next, the students practiced creating an interesting composition and utilized several different ink techniques.

To start with color and paint, students worked in teams to mix tempera paint to match paint samples, completed a one day acrylic study and a one day watercolor painting. I told the students they were not allowed to draw their compositions in pencil for the one day studies, they had to paint directly on the paper. It was good for some of them to loosen up a bit.


Acrylic


Watercolor


Monoprinting

Soon, the students will have the opportunity to work further in the medium they choose and we will start to have assignments based on themes. I can't wait to see what they come up with!
Friday, September 18, 2015
8th Grade Artist List
8th Graders:
Sign up for an artist on this list to research by entering your name next to the name of the artist.
https://docs.google.com/a/jhcobras.net/spreadsheets/d/15rBmDAqSWQQJk_cfplrin-1QzJcm2Elq9VeGUYsjals/edit?usp=sharing
You will be researching the artist and taking notes on a planning sheet. We will use this information for an upcoming project.
Monday, September 14, 2015
Friday, September 11, 2015
Extra Credit Opportunity for HS & 8th Grade
Extra Credit Opportunity
Saturday, September 12th
2nd Saturdays on the Square in Holton, 4-7 PM
Visit the Jackson County History Museum on the southwest corner of the square to see the Robert Sudlow show
OR
Visit More Than Lemons on the east side of the square to see work by several artists including blown glass, wood sculptures, paintings, photography, and more.
Prove you were there
Option 1: Post a photo on Instagram or other social media of a favorite piece with a sentence saying WHY you like it. Use #2ndSatArt. Make your post public or send a screenshot to Mrs.Morris
Option 2: Get a museum worker or artist to sign a piece of paper saying you were there. Write a paragraph about the show. Turn in to Mrs.Morris.
Monday, September 7, 2015
Light Painting
 In preparation for taking school pictures, Computer Graphics students have been learning about photography.
If you break the word down into its roots, photo means light and graph means writing so photography means light writing. It makes sense- early photographs were made by exposing silver particles on treated plates to light which recorded the image. One fun way to really drive home the point about "light writing" is to "paint" with light.


 |
| These students tried spinning in circles while holding a light. |


On the left, a student found that you could shine a bright light from underneath the plastic tables. On the right, a student waved her cell phone around, displaying many colors.

It took a few tries, but we got a nice sword fight.

Here we tried to make an ocean scene with a fish in front and blue waves behind.
Subscribe to:
Posts (Atom)